Methods of firing metal clay:
- Bake off on a gas stove or camping stove
- Bake off with a Torch or hand burner.
- Baking in a silver clay oven or enamel kiln
Silver clay baking on the gas stove
Supplies:
-
Gas stove or camping gas
-
Grid with protective cage
-
Tweezers
-
Possibly a container of water for cooling (no plastic!)
-
Possibly safety glasses against materials jumping around
Safety
Keep in mind that you are now working with open flames. So take your precautions with loose (flammable) clothing, loose hair etc. Also make sure you have tweezers nearby to grab your jewelry or other fireproof pliers.
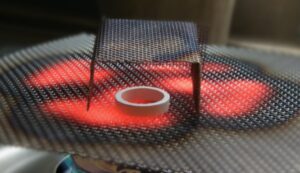
Baking
-
In any case, make sure that the whole thing is thoroughly dry, if this is not the case the workpiece could jump apart. Therefore, always work with a protective cage as well.
-
Place the grate on your stove or camping gas and turn on the gas. Now you will see an area that turns red on the grate. This is the hottest part and also the place where you should put the workpiece (after first turning off the gas again for a while).
-
Place your workpiece on the grid.
-
Turn the gas stove back on. Your workpiece will catch fire first (this is not a problem, this is the binder in the workpiece burning). Also, do not start timing until it has extinguished the flame and the workpiece is glowing.
How long should you fire?
Up to 5 grams 10 minutes
6 -15 grams 15 minutes
It is better to bake larger pieces in a dedicated oven.
When is it better not to bake on the stove:
-
With a large amount of Cork Clay. Small pieces of cork clay will do, but keep in mind that this will smell very bad.
-
If the object is too large and heavy (above about 25 grams of silver and 2.5 to 3 cm long/width)
-
Glass, porcelain, ceramics or other products sensitive to temperature fluctuations*.
-
Full piece out of Art Clay Silver paper (a small piece on an unfired piece goes well)
-
Art Clay Oil paste (small piece, for example sealing a seam of a typesetting box goes well)
-
Art Clay Silver Gold Paste
Cool
CAUTION: baked Art Clay Silver is white in color and so you cannot see if a product is hot or not!!!
A product consisting only of silver clay can be cooled in water.
(Art Clay 950 not! )
If other products were used with it, such as steeples or zirconia – let the jewelry cool in the air. A piece with glass in it can possibly cool slowly after firing between a ceramic blanket or in granules. But always be extra careful! Even at the start, the glass may startle and break apart
Bronze clay and Copper clay are not or less suitable for firing on the gas stove. The methods suitable for each type of clay are described below.
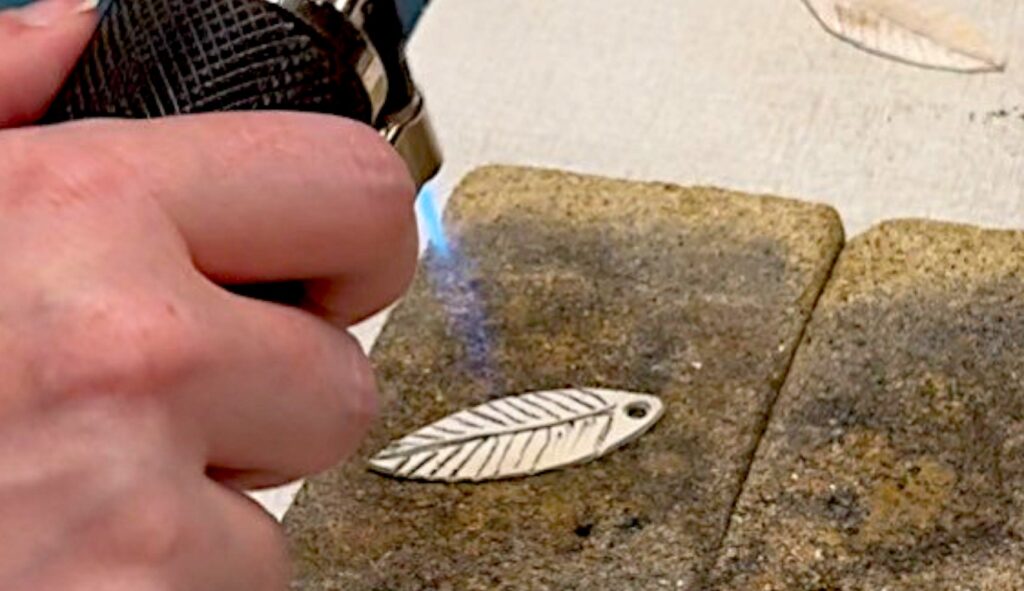
Bake off with a gas burner

A gas burner can be used for small workpieces. The firing process takes only a few minutes. The flame of the gas burner is hotter than the melting point of silver, so it is important to maintain the proper distance from your workpiece and to heat the entire workpiece evenly.
Baking of silver clay
Supplies:
-
Noncombustible substrate (gypsum block, fire board, vermiculite block, etc.)
-
Burner (Micro torch, burner with gas bottle)
-
Tweezers
-
Possibly a container of water for cooling (not plastic)
-
Possibly safety glasses against materials jumping around.
Safety
Keep in mind, of course, that open flames are used and you must take certain safety precautions. Heating should be done in a well-ventilated area, although hardly any smoke will be produced during baking. Also, make sure there are no flammable materials nearby. Consider putting your hair in a ponytail, tidy up the area so that nothing can fall over unexpectedly and be aware of the clothing you wear while working with open flames.
Limitations:
Weight: max. 25 grams.
Baking times:
-
0 – 5 grams: 1.5 minutes
-
6 – 15 grams: 1.5 to 2 minutes
-
16 – 25 grams: 2 to 4 minutes
Cool
A product consisting only of Silver Clay or Copper Clay can be cooled in water. (Art Clay 950 cannot! )
If other products were used with it, such as stones – let the jewelry cool in the air. A piece with glass in it can possibly cool slowly after firing between a ceramic blanket or in granules. But always be extra careful! Even at the start, the glass may startle and break apart
Check out videos explaining how to bake the different types of metal clay with a torch here.
Bake off in an oven
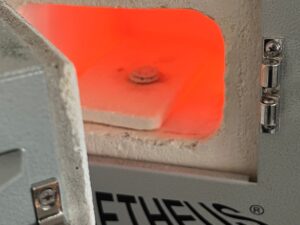
Baking in an electric kiln is the most stable and consistent way to bake metal clay. Electric kilns with programmable functions determine and maintain the temperature inside the kiln, which is ideal for firing metal clay. In addition, these kilns make it possible to bake off larger projects and projects involving organic materials such as stool clay.
Supplies
-
Oven (special metal clay oven or small ceramic oven)
-
Fiberboard and blanket
-
Tweezers
-
Possibly a container of water for cooling (no plastic)
-
Possibly safety glasses against materials jumping around
You do not have an oven and would still like to bake your metal clay piece in an oven? Make use of our baking service. Please contact us for a quote.
Silver clay baking in the oven
-
Place the dry workpiece on the fiberboard and place in the oven.
-
Set the oven to (650°C When the temperature reaches 650°C/1200°F keep this temperature for 30 minutes.
-
Turn off the oven. Once the temperature has dropped below 600°C/1100°F take the fiberboard containing your workpiece out of the oven with a metal spatula or tongs Place on a heat-resistant surface and allow to cool. Turn off the oven switch and unplug the oven.
-
Once your workpiece has cooled you can polish and buff it.
-
Silver clay can be baked off at 650-780 degrees.
-
Baking time depends on the temperature selected.
Baking instructions by type of project / combination of materials.
-
Silver clay only (clay, paste or spray paste) 780°C (1435°F) 5 min
-
Silver clay combined with pure silver (e.g. bail back) 780°C (1435°F) 5 min
-
Silver clay combined with a synthetic stone (e.g. zircone) 780°C (1435°F) 5 min Allow to cool in air. Avoid sudden temperature
-
Silver clay combined with organic material (e.g. cork clay) 650°C (1200°F) 30 min
-
Ensure adequate ventilation because cork clay and other organic materials develop smoke while burning
-
Silver clay combined with Silver clay paste 850°C (1560°F) 10 min Make sure your piece is completely dry before firing it
Cooling silver clay
A product consisting only of Silver Clay 650 series can be cooled in water. (Art Clay 950 cannot! )
If other products were used with it, such as stones – let the jewelry cool in the air. A piece with glass in it can possibly cool slowly after firing between a ceramic blanket or in granules. But always be extra careful! Even at the start, the glass may startle and break apart
Baking off copper clay in the oven
On oven tray:
Make sure the oven is in a well-ventilated area. Place the workpiece in an oven at 970C and maintain this temperature for 30 minutes. Observe safety guidelines while heating.
After heating in the furnace, the surface of the workpiece will oxidize. After heating, take the workpiece out of the furnace using pliers or other tool and quench with water, so that much of the oxidation layer created during heating will come off. The heated workpiece is extremely hot when it comes out of the furnace, therefore be extra careful
Active Carbon Method:
Phase 1: Fill a stainless steel jar (stainless steel) with about 3 cm of activated carbon and place your workpiece above it. Do not seal the jar. If you have several pieces to firing, leave about 1.5 cm between each piece. Fire this for 10 minutes at 500°C and then let everything cool to room temperature.
Phase 2: Continue filling your stainless steel jar with activated carbon so that the work pieces are in the activated carbon, then seal the jar. Place it in a preheated oven at 800°C. Wait for the oven to return to temperature and then fire for 120 minutes. Afterwards, you can let the work piece cool in the oven or remove the jar from the oven and let the pieces cool further in the charcoal.
Warning!!!
When a heated workpiece is exposed to air, the oxidized layer cracks and even small pieces can fly off the workpiece! To ensure safety, it is advised to immediately place a fiber cloth over the workpiece.
Oxidation layer removal
Finish the workpiece with a wire brush and, if necessary, dip the workpiece in a bath of lukewarm vitrex solution (alternatively, a warm bath with vinegar and table salt).After this, rinse the workpiece carefully and dry it.
Bronze clay bake off in the oven
Notice! Method of heating White Bronze clay is different from regular Bronze clay and is described separately below!
On oven plate
Make sure the oven is in a well-ventilated area. Preheat the oven to 820 degrees C. When the oven has reached the correct temperature, place the workpiece (preferably on a fiberboard to protect the bottom of your oven) in the oven. Close the door and wait for the kiln to reach the temperature of 820 degrees C again. You will fire for 30 minutes from that point.
When the firing is finished and your workpiece does not contain zirconias and the like, immerse the workpiece in cold water or let it cool to remove oxidation. While heating, observe safety guidelines.
Activated carbon method
Fill a stainless steel container with about 3 cm of activated carbon. Place the workpiece on top of the carbon. Leave the tray open. For multiple pieces, leave about 1.5 cm between pieces. Fire this for 10 minutes at 500 degrees Fahrenheit and then let it cool to room temperature.
Further fill the stainless steel tray with activated carbon so that the work pieces are in the activated carbon and seal it. Place it in a preheated oven (820 degrees C). Wait for the oven to return to temperature and then fire for 60 minutes. You can let the work pieces cool in the oven, or remove the stainless steel tray from the oven and let the pieces cool in the charcoal.
White bronze clay bake off in the oven
Heating White Bronze follows a different method.
Place the dried workpiece on a stainless steel grid and place it in a preheated oven at 500°C/ 932°F, or on the gas stove. Fire it for 10 minutes, place it on a refractory surface and let it cool.
Put about 3 cm. Activated charcoal on the bottom of a stainless steel container. Place the workpiece on the charcoal, leaving at least 1.5 cm space between several workpieces, and fill the container with the activated charcoal . Put the lid on the container and place the container in a preheated oven at 770°C / 1420°F. Fire for 2 hours. When the firing process is finished, you can let it cool in the oven or remove the container from the oven and place it on a refractory surface until it has cooled enough to remove the work pieces from the charcoal.
White Bronze can be combined with Bronze Clay or Copper Clay and fired at the same time with the same firing schedule. Then keep in mind that the shrinkage of the different clays is also different.
-
Copper clay 9-10%
-
White Bronze Clay 10 /11%
-
Bronze clay 13%.
Annealing (annealing):
To ensure that the workpiece obtains maximum strength and ductility, it is necessary to anneal the White Bronze Clay. Fire up your workpiece to 565oC (1050F) and keep it there for 5 minutes. Remove your workpiece from the kiln and throw it straight into cold water.
Oxidation layer removal
Finish the workpiece with a wire brush and, if necessary, dip the workpiece in a bath of lukewarm vitrex solution (alternatively, a warm bath with vinegar and table salt). After this, rinse the workpiece carefully and dry it.